Wednesday, March 20, 2013

Savory Stuffed Peppers

Originally posted on November 8, 2012 at http://www.delicieux.eu/?p=1240 as a guest post.


It's been nearly a full year since I started writing as A Reluctant Foodie. I’ll admit to having been a little lazy about posting lately, but this is my 83rd posting -- not bad for someone who hadn’t written much since college ( I won’t date myself by telling you when that was). In that year I've learned a lot about myself, blogging and social media in general.

Like every other new blogger, my biggest challenge was getting people to actually visit and read what I had written. I figured out pretty quickly that the best way to drive traffic to the blog was through Twitter. So, @ReluctantFoodee was launched on Twitter. Yes, I know it is spelled wrong -- @Reluctantfoodie was taken. At first, I struggled to get followers but as of this writing, I have over 1,400 followers! I'm proud to say that since I don't buy followers, rarely follow back commercially oriented people/businesses and I block the obvious spammers my follower count is pretty pure.

A few amongst this illustrious group have become friends, as much as people who have never met can be friends. One in particular stands out. Anneli is an Englishwoman living with her husband and children in the French Pyrenees. She is a private chef who blogs at Delicieux . You really should check out her out.
Recently, in an effort to pull me out of my writing funk, I proposed that it might be fun for both of us to prepare the same basic dish and to guest blog the results for each other. Now, in the spirit of full disclosure, and I've pointed this out in many of my other posts, I don't cook. The culinary talent in our home is all with my wife Cynthia. I eat, clean up and write, period. So really, Cynthia and Anneli decided to make the same basic dish. There, I feel better now.

If you're a regular reader you know that Cynthia and I garden a good bit. We try to grow a reasonably wide selection of veggies because they are so much better than anything you can buy at even the best supermarkets. When Anneli and I hatched our little plot, we happened to have a goodly number of ripe peppers ready to be harvested. We agreed on stuffed peppers as the common dish because, everyone loves a good stuffed pepper, right?

Here is the recipe Cynthia put together for the great stuffed pepper challenge!


 Ingredients
  • 1 pound ground beef
  • 4-6 whole peppers, tops and ribs removed, meat from around stem chopped and reserved for filling


  •         2.5-3 cups cooked rice 
  •          3 slices good smoky bacon
  •          1 cup chopped onion
  •          vegetable oil
  •          2 cloves garlic, smashed
  •          2 tbsp tomato paste
  •          2 tsp curry powder (or to taste)
  •          1/2 tsp crushed red pepper (or to taste)
  •          1 tbsp brown sugar, 1/3 cup sherry, 1/3 cup Kikkoman teriyaki sauce, 2/3 c water – mixed together
Preparation
In a large mixing bowl, place beef and room temp rice.  You'll be adding ingredients to this bowl as we go, so size accordingly.

Cook bacon in skillet until crispy.  Remove from heat and set aside to drain.  Leaving bacon fat in pan, add enough additional oil so you have a nice thin coat of fat in the pan.  About a tbsp total.

Saute onions on med-high heat until soft.  Dump on meat and rice.

Crumble bacon.  Dump on meat, rice and onion.

To make the sauce:  Put the pan back on medium high heat, add 1 tbsp veg oil and when hot but not smoking, add curry powder and red pepper, stirring constantly.

When fragrant, about 30 seconds in, add garlic and tomato paste.  Cook for a minute or so - the fragrance should be roasty, but not burned.  (If your curry or garlic burns, start over.  The bitter taste will never go away.)

Add the sherryaki mixture (get it, sherry-aki) and whisk a bit to remove all lumps and smooth out the sauce. Simmer for 10 minutes, until you taste the sauce and the alcohol from the sherry isn't prevalent.  (If this doesn't happen, you need to buy better sherry.  I use an amontillado that I also drink as an aperitif.  If you can't drink it from the bottle, it won't get better with cooking.)

Season sauce to taste with salt and pepper.  Add more crushed red pepper if you like a little hurt.

Add about 1/4 cup of sauce to the bottom of a baking dish.

Add half of what's left to the meat, rice, onion and bacon mixture. Mix thoroughly but gently.

Fill pepper one at a time and place in baking dish.  It helps if it has high sides and holds the peppers snugly. If all you've got is a low rider, cut peppers in half instead of removing top.  Not as pretty, but I like the ratio of pepper to filling better this way.

Before covering with foil (I parchment first then foil) distribute the remainder of the sauce on top of the peppers.


 Bake covered for 45 minutes at 350.  Uncover and bake an additional 15.  The sauce takes to browning very well, so if you're of a mind, a low broil helps you get your brown on.


 Let sit a few moments before serving.


Thursday, March 14, 2013

Yes, I did! Gluten Free Chocolate Chip Quinoa Cookies


We get a lot of requests from our no wheat friends for gluten free sweets - something with a nice buttery richness and that crunchy crunch that seems to be missing from most wheat flour free baked goods.  Ladies and gentlemen, I have your recipe.

This came about when we received a new cook book pre-distribution for comments and a possible talk up in the blog.  This was our first bit of unsolicited swag, and you may note, we have not talked up a new cookbook of any sort.  The recipes we tried just weren't great.  And we shoot for great.

There were quite a few recipes for gluten free sweets of one sort or another - now this was not a gluten free cookbook, but one all about using an ancient grain from the high desert south of the equator.  Just so happened a lot of the recipes were gluten free.  After trying 3 or 4 of the desserts, and throwing out 3 or 4 of the desserts into the garrrbaggge, I set out to make something better.  Through trial and error, and quite a few taste tests (thank you to those of you who tried the icky ones even when I told you they stunk just so we could agree on it), I have an easy recipe for a gluten free chocolate chip cookie.  They're delicious and easy.

Quinoa Chocolate Chip Cookies
makes about 2 dozen

1 1/4 cup quinoa flour*
1/2 tsp baking soda
1/2 tsp sea salt or other fine salt
1 large egg
1/2 cup unsalted butter, melted and cooled
1/2 cup brown sugar, packed
1 1/2 tsp vanilla extract
2/3 mini chocolate chips

Preheat oven to 350 degrees for at least 1/2 hour.  Cookies will not be as crispy as they can be if your oven isn't hot enough.  

In a medium bowl, whisk together the flour, soda and salt.  Add egg to the melted and cooled butter and beat well until egg is incorporated.  Add brown sugar and vanilla, stir well to combine and add to the flour mixture.  Mix well and stir in chocolate chips.  Chill dough well - at least 20 minutes and 30 is better.

Dough will scoop easily once chilled.  Roll into 1" balls and place about 2" apart on cookie sheets, flattening slightly with your fingers as dough will not spread during baking.

Bake for 9 minutes, until ever so slightly brown at the edges and top.  If you over bake, you'll get a crumbly dry cookie.  Cool in the pan.  Since these rarely make it out of day one, I'm guessing a sealed container on the counter would be fine for storage.

*****UPDATE on these cookies - I inadvertently over baked a batch by about 6 minutes.  My quinoa go to guru said that if this happened, they would be sandy and dry.  Boy was she wrong!  They got nutty and crispier and didn't dry out.  They were better!*****


*quinoa flour can be made by grinding quinoa in a high speed, high power blender like our most favorite tool, the VitaMix.  They even have a special attachment for making grains into flour.  But should you not have a beloved VitaMix, you can purchase quinoa flour ready to go at most well stocked grocers these days, and my personal favorite is from Bob's Red Mill.  
Made with Love Mondays, hosted by Javelin Warrior

Tuesday, March 12, 2013

Grandma's Meatballs - Only Better!


A while back, my friend Anneli (@Delicieux_fr on Twitter) and I wrote guest posts for each other’s blog. The subject was stuffed peppers and we had so much fun that we agreed to do it again. Since I had suggested the ingredient the first time, it was Anneli's turn to come up with the theme. She sent me a list (there's always a list, isn't there?) and one in particular seemed perfect. Balls! OK people, get your minds out of the gutter, we’re talking food here.

She explained that since there are so many foods that are served in a round form, we would have a broad list to choose from. You may think I've picked the absolute most obvious kind of food ball -- the meatball -- and I'd have to say that you're probably right, but let me explain.

My grandparents came to the United States from Calabria, Italy in the early 1920s. Like hundreds of thousands of other immigrants, they brought with them a culture of food that was specific to not only their country, but their local region. Some of the best memories of my childhood are of Sunday afternoon dinners at my grandparent’s house where spaghetti and meatballs were front and center.  The recipe my grandmother used was simple, a good handful of grated cheese lightly and delicately mixed into each pound of ground meat.  This works beautifully if your sauce is complex and has been simmering with bones and sausages all day, the way hers was.  The recipe that Cynthia and I use today is based on what my grandmother brought from Calabria, but our sauce is a simple marinara made with tomatoes picked at the height of summer from our garden, roasted with garlic and olive oil then frozen or canned.  So, for me, there was almost no choice but to write about these meatballs! For a more detailed description of how we roast our tomatoes, click here.

You might ask, what's so special about meatballs? Anyone can make them, right? Well, sort of, or at least some version of them. The fact is, I've had lots of bad meatballs over the years. Done right, they can be flavorful and tender (yes, I said tender). Done badly, they are often tasteless and rock hard. Ick! The trick to tender balls is.....drumroll please.....simmering sauce.  When the balls hit the sauce, it must have already been brought up to a boil and then back down to a nice simmer.  Bringing it up to a boil first insures the entire pot has been heated thoroughly.  If your sauce is boiling or cold, you will have tough balls.  No one likes tough balls.  Well, OK, our dogs will eat them, but then they've not turned their noses up to anything from the kitchen yet (or from the yard for that matter). Here’s how you too, can have tender balls.

Ingredients (makes 12 meatballs)

  • ·         1 tbsp Extra Virgin Olive Oil
  • ·         1shallot, preferably the long french variety, minced
  • ·         1 tbsp fresh minced rosemary or 1 tsp dry crumbled
  • ·         1/4 cup port wine 
  • ·         6-8 dashes worcestershire sauce
  • ·         2 tsp soy sauce
  • ·         2 tbsp fresh parsley chopped fine
  • ·         2 eggs (optional)
  • ·         1/4-1/2 cup freshly grated cheese - parmigiano reggiano, locatelli romano or grana padan
  • ·         1/2 cup FRESH bread crumbs*
  • ·         2-4 tbsp milk or cream
  • ·         1 pound ground meat (1/4 veal,1/4  pork,1/2  beef – this blend adds flavor and texture)
  • ·         salt/pepper to taste

 Preparation

  • ·In a small skillet, on medium high heat, saute the shallot in EVOO until a little browning begins at the edges.  Add rosemary, wait 30 seconds, then add the port.  Allow to bubble until reduced by at least half.  Set aside to coo
  •  In a small bowl, combine fresh breadcrumbs with milk or cream.  If your bread is very fresh, you'll need less milk - you want a nice moist crumb, but not wet, otherwise you'll make paste.  Not tasty.  Let sit for 5 minutes or so and fluff it right before you use it. 
  •  Place ground meat in a large bowl, hit with 6-8 dashes Worcestershire.  Sprinkle lightly with salt and pepper, flip it over.  Sprinkle soy over, then parsley, eggs (if using), cheese, shallot mixture and breadcrumbs. Mix thoroughly but gently, do not shmush.  When it's mixed to your satisfaction - if it's too wet add a little more cheese and if it's too dry add a little milk or tomato sauce - pinch off a little bit, form it into a mini pattie and saute.  Let it cool a bit and taste.  Adjust seasoning if needed and please don't skip this step.  
  • You could, at this point, form the meatballs into a meatloaf, or patties for meatloaf burgers.  It’s also tasty dropped into stock for Italian wedding soup. Mix it with rice and stuff some cabbage leaves or peppers.  I think you get where I'm going with this - it's a very versatile mixture.
  • Form into balls.  I use a small ice cream scoop that holds a tablespoon, and scoop twice, loosely. You want to form a nice ball, but again, don't shmush.  Light but firm pressure. 


  • At this point, you have two options, to fry or not to fry.   If you're feeling lazy, just drop the balls into SIMMERING sauce.  If you want a little more umami going in the finished product, saute them until golden brown and delicious on all sides. 


  • This can be tedious and messy, and although I like a brown ball, I think the un-browned balls are a wee bit tender-er and I don't miss the extra bit of meatiness.  In fact, when it's a simple marinara, I think I prefer it without the extra step.

  • Once the balls are in the sauce, simmer for at least 1/2 an hour. 


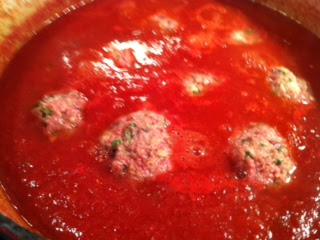
  • When they’re done, they should be tender enough to cut with almost no downward pressure by a fork and should look something like this…..


*A note on fresh breadcrumbs: day old bread works best, and I use my spice mill to pulverize it.  Added bonus, it cleans the mill and may pick up a little interesting spice in the process.  Should your bread be too fresh, toast it before blitzing.  Need to be gluten free?  Sub in some crushed Rice Krispies, Gluten Free or cooked rice that you've taken a knife to, but do not use the milk or cream, just straight in.


Buon Appetito!
You can see Anneli’s guest post about balls on my blog site, A Reluctant Foodie by clicking here!

 Originally posted on January 4, 2013 at http://www.delicieux.eu/?p=1374 as a guest post.

Tuesday, March 5, 2013

Getting in a Stew!

A Guest Post by Anneli from Delicieux


Hello again, I'm back here again on A Reluctant Foodie! Al and I decided to go head to head for a third time with a new blog challenge as we have enjoyed our previous battles so much (Stuffed Peppers and Meatballs).

This time round we settled on the theme of 'Soups of Stews' which seemed utterly perfect for this time of year and the kind of food you feel like eating over the Winter months.In fact, I eat soup numerous times a week and I am always pulling out the slow cooker at the weekends to knock up some kind of stew. When it's cold outside, I crave bowls of hot nourishing food that comfort and sooth the soul. So I was more than happy to ponder and devise such a restorative dish for this challenge.

After much consideration I settled on a Seafood Stew with the main ingredient being a rather divisive one so I hope I don't scare you off! I have chosen to use squid, not everyone's favorite ingredient but certainly one of mine. So much so that if I see squid on a restaurant menu nine times out of ten I will opt for it. I love the taste and texture when it's cooked right. The key is to cook it very quickly or very slowly. Anything in between can result in rather unappetizing rubberiness, but get it right, and it's a true delight.

I think that for most people, seafood stews are more affiliated with Summer. They are of course lighter than their meatier counterparts and are often bursting with Mediterranean flavors. So my challenge was to produce something that befitted Winter and the innate need for heartier substance that it breeds.

So, as well as squid, I have included chunks of chorizo sausage which adds an intense heat to the stew and also king prawns. All cooked leisurely with tomatoes and red wine in a rich, powerful seafood stew that most certainly has the power to banish your Winter blues and bolster your body against the elements.


The squid is soft and stained red by the wine, the chorizo provides a kick of heat and the prawns pop juicily in your mouth.The resulting stew is truly delicious and memorable. If you are anti-squid, this could be the dish that changes your mind. Honestly, I cannot imagine anyone who wouldn't like this wonderfully flavorsome dish.

This was most definitely worth getting in a stew over!

Spicy Squid, Prawn and Chorizo Stew
Serves 4

  • 300 grams of squid, cleaned and prepared into rings
  • 2 tbsp of olive oil
  • 2 onions, chopped
  • 2 garlic cloves, finely chopped
  • 1 tsp of dried thyme
  • 1 400 gram can of chopped tomatoes
  • 125 grams chorizo, chopped into chunks
  • 150 ml red wine
  • 200-400 ml water
  • 250 grams of raw king prawns
  • 1 tbsp parsley, chopped
  • 1 squeeze of lemon juice

  • In a large pan, heat the olive oil. Add your squid rings and cook for a couple of minutes. Add the onion, chorizo, garlic and thyme and cook for 5 minutes until it hall softened and some of the red oils have seeped out of the chorizo and stained the other ingredients beautifully. 


  • Stir in the tomatoes, red wine and 250 ml of the water. Bring to boil, cook and for 2 hours. Check occasionally and give it a stir. Add extra water periodically of you think that the sauce is becoming too dry and thick.


  • 10 minutes before the two hours of cooking are up, add your king prawns to the stew and stir them in. Squeeze in some lemon juice and let it cook for the last few minutes until your prawns are cooked through.Check the seasoning.
  • Serve with some couscous and sprinkle over some parsley. Heavenly.


About the Author

I am a Private Chef living in South West France. I am a 36 year old mother of two, living the rural dream. I love to cook all food and am inspired by fresh produce and the cuisine here in France. From rustic traditional dishes to vegetarian fine dining, I try to cook it all and share my journey with you. Stop by and check it out here!

And also into Herbs On A Saturday hosted this month by London Busy Body


Pea on this, Pea on that

Peas have a reputation.  And it ain't good - starchy and a weird color, very often the color of something a babe has recycled. But in fa...